When learning how to use Adobe Photoshop, you always want to learn something new, or a better technique, that could help you improve, and speed up your work. Those who use Photoshop know that there are always different ways to do the same thing. However, I noticed from my ten years of teaching that very few take advantage of the different options each tool can provide as well as using Photoshop palettes itself to make things happen. For example, with the Channels Palette you not only can create and manage channels but you can load the luminosity pixels in an image as a selection, make a selection from a channel, create a grayscale image from a channel, create spot color channel, access and edit saved alpha channel, and more. Let me share how to use some of these options:
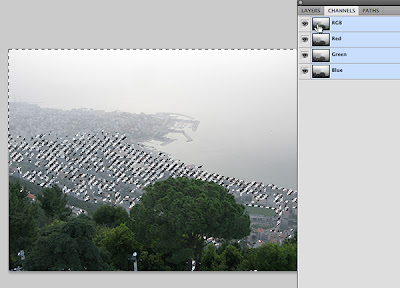
1- Hold the CTRL (PC) or the Command key (Mac) and click on the Composite color channel (The RGB Channel in RGB mode or The CMYK Channel in CMYK mode) to load the image luminosity pixels (Light pixels). (See image below) Switch to your layers palette, hit CTRL + J to put the selected pixels into its own layer. Now you can change the blending mode of that layer to lighten or darken the luminosity pixels (Multiply to Darken, and Screen to Lighten). You can also sharpen this layer or add any other filters. The shortcut for this command in Windows is Control-Alt-~, while in Mac it is Command-Option-~.

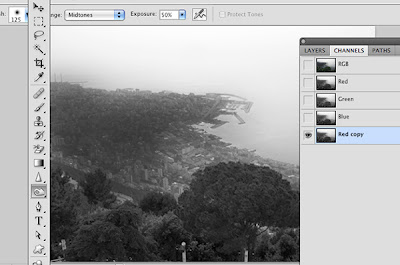
2- One of the options to mask a difficult image is to duplicate one of the channels, one that has the most contrast between the object you want to select and the background, to create a new Alpha channel. In my example below, I used the Burn tool to darken the gray pixels, and the dodge tool to lighten the light area. You can also achieve the same thing, darkening dark pixels and lighting light pixels by using Adjustments>Levels. The Alpha channel should end up in black and white pixels only. You can then CTRL click the channel icon to load a selection based on the black & white area.

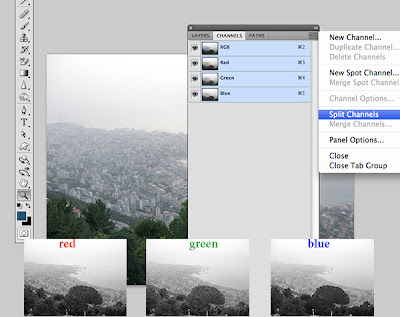
3- Selecting the Split Channels option/command in the Channels palette will put the channels into their own individual documents. You can then select your favorite grayscale image. See image below.
In the image below, the Blue channel gave the best black & white result.

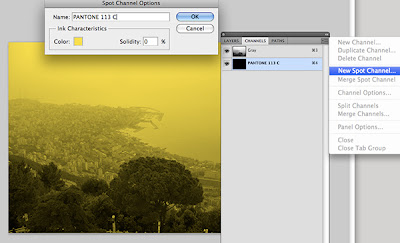
4- With the channels palette you can create a spot channel. For those who do not know about spot channel, it is third channel type (Color channels and the Alpha channels are the other two types). You create a spot color when your client requests a spot color to be used in their project. Spot colors are colors that are very difficult to produce with a mix of CMYK inks. From the channels Flyout menu, choose New Spot Channel option. See image below.

As in many applications, you need to keep practicing, and try to understand how each and every tool works, how to change its settings, and the logic behind it.


